Learn how to send and receive SMS messages using a MySQL database with Diafaan SMS Server. Get instructions about the installation of the ODBC driver, create the database with an SQL script and how to connect to the database with the connection string for MySQL.
MySQL
MySQL is one of the most popular database programs available. Diafaan SMS Server can use an ODBC driver to connect to MySQL. For this article MySQL version 8.0.20 was used with the MyODBC 8.0 driver.
Install the MyODBC driver
Before Diafaan SMS Server can send and receive SMS messages from the database you have to make sure the MyODBC 8.0 driver is installed on the computer running Diafaan SMS Server. You can find the MyODBC driver on the MySQL website.
Create the SMSServer database
You can use the MySQL command line client to create the database tables. Of course it is also possible to use an existing database, but if you want to be sure you can use all options available in Diafaan SMS Server you may use the SQL commands below necessary to create the database tables to send and receive SMS messages and to keep the send log.
CREATE DATABASE SMSServer DEFAULT CHARACTER SET utf8mb4;
CREATE TABLE MessageOut ( Id INT NOT NULL AUTO_INCREMENT PRIMARY KEY, MessageTo VARCHAR(80), MessageFrom VARCHAR(80), MessageText TEXT, MessageType VARCHAR(80), MessageGuid TEXT, MessageInfo TEXT, Gateway VARCHAR(80), UserId VARCHAR(80), UserInfo TEXT, Priority INT, Scheduled DATETIME, ValidityPeriod INT, TLVList TEXT, IsSent TINYINT NOT NULL DEFAULT 0, IsRead TINYINT NOT NULL DEFAULT 0) CHARACTER SET utf8mb4;
CREATE INDEX IDX_IsRead ON MessageOut (IsRead);
CREATE TABLE MessageIn ( Id INT NOT NULL AUTO_INCREMENT PRIMARY KEY, SendTime DATETIME, ReceiveTime DATETIME, MessageFrom VARCHAR(80), MessageTo VARCHAR(80), SMSC VARCHAR(80), MessageText TEXT, MessageType VARCHAR(80), MessageParts INT, MessagePDU TEXT, Gateway VARCHAR(80), UserId VARCHAR(80)) CHARACTER SET utf8mb4;
CREATE TABLE MessageLog ( Id INT NOT NULL AUTO_INCREMENT PRIMARY KEY, SendTime DATETIME, ReceiveTime DATETIME, StatusCode INT, StatusText VARCHAR(80), MessageTo VARCHAR(80), MessageFrom VARCHAR(80), MessageText TEXT, MessageType VARCHAR(80), MessageGuid TEXT, MessageInfo TEXT, MessageId VARCHAR(80), ErrorCode VARCHAR(80), ErrorText TEXT, Gateway VARCHAR(80), MessageParts INT, MessagePDU TEXT, Connector VARCHAR(80), UserId VARCHAR(80), UserInfo TEXT) CHARACTER SET utf8mb4;
CREATE INDEX IDX_MessageId ON MessageLog (MessageId, SendTime); |
Add the SQL Connector
Now you can add the new database to Diafaan SMS Server. First create a new SQL Connector with the connector wizard and select ODBC as the database type. On the next page you can provide the ODBC connection string, the following connection string should be adapted for your database installation:
Driver={MySQL ODBC 8.0 Driver};Server=myServerAddress;charset=UTF8MB4;Database=myDataBase;User=myUsername; Password=myPassword;Option=3; |
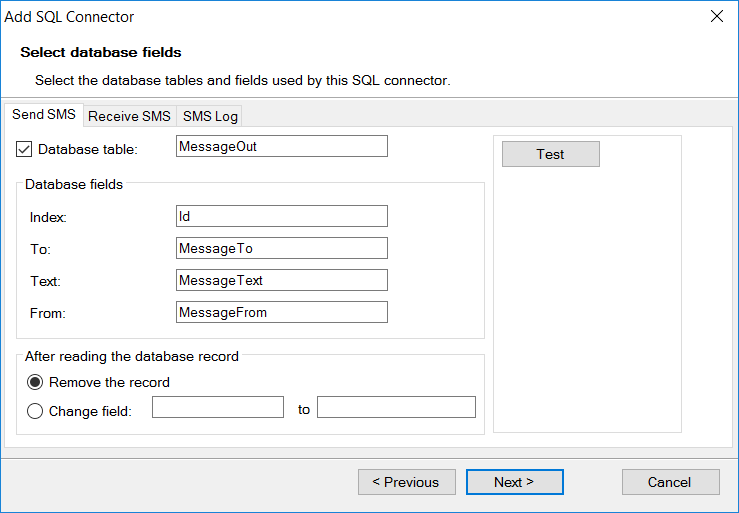
Select the database fields
On the next wizard pages you can select the database tables and fields you want Diafaan SMS Server to use. You can only select the most used fields here. Additional database fields can be selected later on the advanced tab page in the connector properties dialog.
For more information see Access your database.
It is a good idea to change the database flavor option on the same advanced tab page to MySQL. This will instruct Diafaan SMS Server to use a specific SQL syntax for MySQL enhancing performance somewhat.